I previously talked about “Running Github Hubot on a Windows machine”, “Using Github hubot and Appharbor service hook to get deployment status in Campfire/HipChat rooms” or even “Starting TeamCity builds from HipChat using Github Hubot”.
All those solution rely on an external chat service either Altassian HipChat or 37signals Campfire.
If you want to have your own all integrated experience with all your tools running on premise I propose to look how you might do that using Jabbr and Hubot on a windows machine.
Jabbr is a chat application built with ASP.NET and SignalR. It is open source, available on Github, and provided by David Fowler. Easy to install too as you will see.
To install it the only thing you will need to do is to clone it from Github. You might use Github for Windows then you are one click away from having the clone on your local machine, just visit Jabbr Github page and click Clone in Windows button.
Next step is to create a database named Jabbr, for example in Sql Express.
Finally run the build.cmd from the Jabbr cloned folder which will produce a site folder in the target folder of the Jabbr cloned folder.
Then leverage WebMatrix by right clicking ‘Open as a Web Site using WebMatrix’ and finally click Run.
You should end up with your own local installation of Jabbr, something like the following
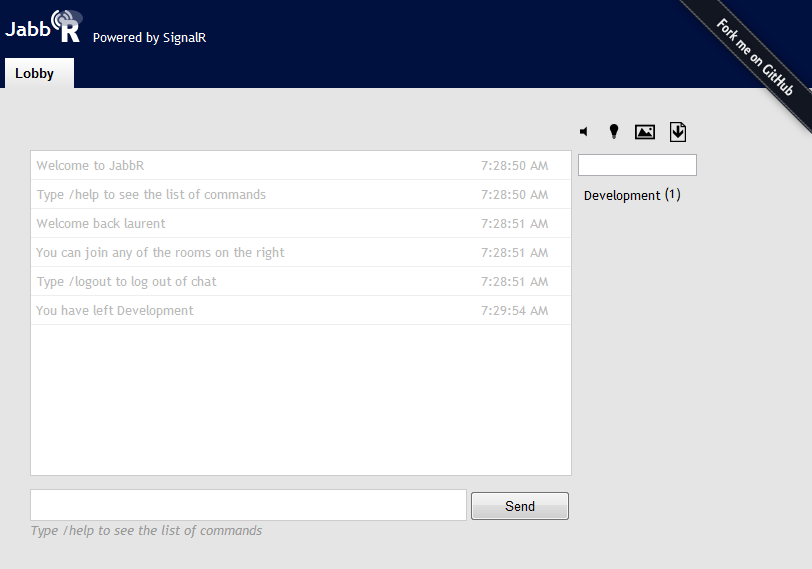
Then create a user using /nick [user] [password]
Now let’s create a Jabbr room which will be joined by our Hubot later on.
You just need to use the Jabbr command: /create [room]
Let’s use Development as the name of our room.
Now we are ready to install the second part of our solution Hubot.
Hubot comes with the notion of adapters which makes it very flexible toward what system it can connect to. In our case we would like to have Hubot connecting to Jabbr so we need a Jabbr adapter. Thanks to Scott Moak for creating one which is available here.
But before we need to to install nodejs and Hubot, just follow my previous post “Running Github Hubot on a Windows machine” which is still working with nodejs v0.8.2.
Update: After a short discussion with Tom Bell (@thetombell) on Twitter it is clear that I made too complicated. Thanks Tom for pointing out the easiest way!
So here it is!
mkdir hubot-local

cd hubot-local

npm install hubot

cd node_modules\hubot

npm install https://github.com/smoak/hubot-jabbr/tarball/master
So now we need to integrate Scott Jabbr Hubot adapter. To achieve that from the same prompt your installed Hubot, you will need to install one dependency of the Jabbr adapter which is njabbr so go on and type
npm install njabbr
Now you would need to clone Hubot Jabbr adapter and get the file src/jabbr.coffee and copy it in the adapter /hubot/src/adapters folder of hubot.
Finally just adapt the /hubot/src/robot.coffee to add the new Jabbr adapter like this
HUBOT_DEFAULT_ADAPTERS = [ “campfire”, “shell”, “jabbr” ]
And the last step is to configure some environment variable used by the Jabbr adapter so that hubot connects to the Jabbr chat application and room.

In this example I used the excellent WebStorm from JetBrains but you could do it directly from your environment.
Update: if you don’t have WebStrom you might use PowerShell and
$env:HUBOT_JABBR_PASSWORD = ”HubotPwd”
$env:HUBOT_JABBR_ROOMS = ”Development”
$env:HUBOT_JABBR_HOST = ”http://localhost:17221”
Update: Settings the environment variables like shown previously uses a process-level environment variable (that is, an environment variable that is only visible to, and lasts only as long as, your current PowerShell session). To create more permanent environment variables (i.e., user-level or machine-level) you need to use the .NET Framework and the SetEnvironmentVariable method
[Environment]::SetEnvironmentVariable(“HUBOT_JABBR_PASSWORD”, “HubotPwd”, “User”)
[Environment]::SetEnvironmentVariable(“HUBOT_JABBR_ROOMS”, “Development”, “User”)
[Environment]::SetEnvironmentVariable(“HUBOT_JABBR_HOST”, “http://localhost:17221”, “User”)
Now the only differences from what we have seen in the previous article ““Running Github Hubot on a Windows machine” is that we need to run hubot with the following command line specifying that we want to use the Jabbr adapter:
node .\node_modules\coffee-script\bin\coffee .\bin\hubot –a jabbr
And again the magic starts
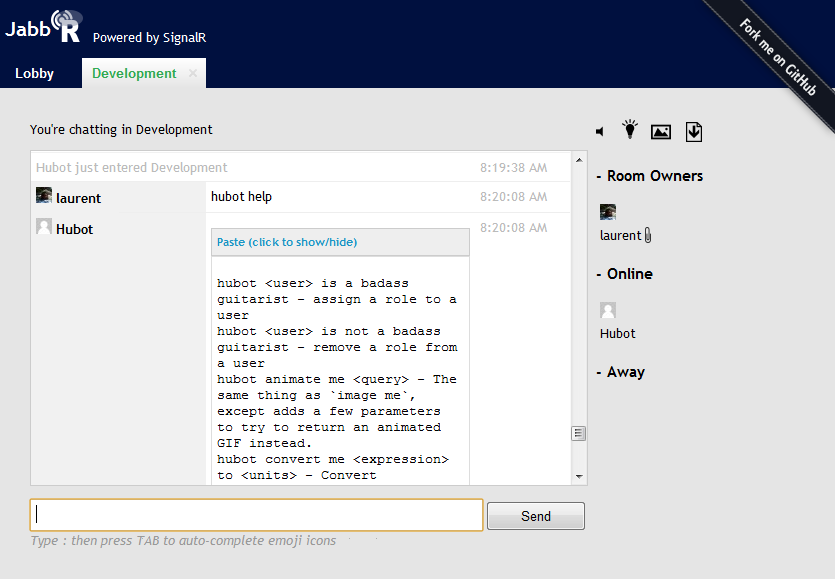
As you can see we have Hubot joining our Jabbr Development room and replying to our command. For sure all our Hubot scripts are working, so it lets me check and start builds on TeamCity, but also see AppHarbor deployment status. It is very really easily extendable with new hubot scripts written in CoffeeScript. So it let you customize and automatize most your daily processes. A big win!