
In my earlier posts, I’ve demonstrated how to install Ollama using the Windows installer. However, for developers, there’s a more streamlined method to set up Ollama on your machine.
In this blog post, we’ll explore how to run DeepSeek-R1 by harnessing the capabilities of .NET Aspire alongside Ollama on your local environment.
Introduction
Update following discussion on Reddit, thx Rinecamo and LSXPRIME
The post is using DeepSeek-R1-Distill-Qwen-1.5B model which is created via fine-tuning against several dense models widely used in the research community using reasoning data generated by DeepSeek-R1. The real Deepseek R1 is 671B parameters model, 404GB in size, and requires a lot of resources to run. So, it would definitely not work on my local machine.
Ollama offers a Docker image that can be seamlessly executed on your local machine. By integrating Docker with .NET Aspire, you create a robust solution for running diverse large language models (LLMs) and small language models (SLMs) efficiently. And you still can use your beefy GPU to accelerate the answer generation process.
This setup ensures that Ollama operates within an isolated containerized environment, providing enhanced security and consistency without the necessity of installing additional software directly on your machine.
Prerequisites
Before proceeding, ensure that you have the following prerequisites installed on your machine:
Setting up DeepSeek-R1 with .NET Aspire and Ollama
Step 1: Create a new .NET Aspire project
To run DeepSeek-R1 with .NET Aspire and Ollama on your machine, we will start by creating a new .NET Aspire project. Open a terminal window and run the following command to create a new .NET Aspire project:
mkdir DeepSeekOllamaAspire\
cd .\DeepSeekOllamaAspire\
dotnet new aspire-starter
cd .\DeepSeekOllamaAspire.AppHost\
dotnet add package CommunityToolkit.Aspire.Hosting.Ollama  // 👈🏼 .NET Aspire Ollama Hosting
cd ..\DeepSeekOllamaAspire.ApiService\
dotnet add package CommunityToolkit.Aspire.OllamaSharp  // 👈🏼 .NET Aspire Ollama Client
Step 2: Configure .NET Aspire AppHost
The code for the .NET Aspire AppHost is configuring the Ollama server hosting integration. It is adding the Ollama container to the app host, configuring data volume, GPU support, and container lifetime. Additionally, it adds the DeepSeek-R1 model to the Ollama server.
var builder = DistributedApplication.CreateBuilder(args);

// 👇🏼 Configure Ollama server hosting integration
var ollama =
    builder.AddOllama("ollama") // 👈🏼 Add Ollama container to the app host
        .WithDataVolume() // 👈🏼 Adds a data volume to store models
        .WithGPUSupport() // 👈🏼 Use your beefy GPU 🎉
        .WithLifetime(ContainerLifetime.Persistent); // 👈🏼 Keep the container running
                                                     //    when the app exits

// 👇🏼 Add DeepSeek-R1 model to Ollama server
var chat =
    ollama.AddModel("chat", "deepseek-r1:1.5b");

var apiService =
    builder.AddProject<Projects.DeepSeekOllamaAspire_ApiService>("apiservice")
           // 👇🏼 Our Web API relies on Ollama chat and waits for it to start
           .WithReference(chat)
           .WaitFor(chat);

builder.AddProject<Projects.DeepSeekOllamaAspire_Web>("webfrontend")
    .WithExternalHttpEndpoints()
    .WithReference(apiService)
    .WaitFor(apiService);

builder.Build().Run();
Step 3: Configure .NET Aspire ApiService
The code for the .NET Aspire ApiService is configuring the Ollama client integration. It is adding the Ollama client to the IOC and registering it as a chat client. Then it is used to call the Ollama API to get an answer from DeepSeek-R1.
using Microsoft.Extensions.AI;

var builder = WebApplication.CreateBuilder(args);

// Add service defaults & Aspire client integrations.
builder.AddServiceDefaults();

// 👇🏼 IOC registration of OllamaSharp client as IChatClient
builder.AddOllamaSharpChatClient("chat");

builder.Services.AddProblemDetails();
builder.Services.AddOpenApi();

var app = builder.Build();

app.UseExceptionHandler();

if (app.Environment.IsDevelopment())
{
    app.MapOpenApi();
}

// 👇🏼 Web API getting IChatClient from IOC
app.MapGet("/chat", async (IChatClient chatClient, string question) =>
{
    // 👇🏼 Calling Ollama API to get an answer from DeepSeek-R1
    var response = await chatClient.CompleteAsync(question);
    return new Response(response.Message.Text ?? "Failed to generate response.");
})
.WithName("Chat");

app.MapDefaultEndpoints();

app.Run();

public record Response(string Value);
Step 4: The web frontend
The web frontend is a simple Blazor application. It sends the question to the API service and displays the answer. It doesn’t know anything about Ollama or DeepSeek-R1. It just knows about the API service.
We create a ChatApiClient that uses HttpClient to call the API service. The ChatAsync method sends the question to the API service and returns the answer.
public class ChatApiClient(HttpClient httpClient)
{
    public async Task<string> ChatAsync(string question,
                                        CancellationToken cancellationToken = default)
    {
        var requestUri = $"/chat?question={question}";
        var response =
            await httpClient.GetFromJsonAsync<Response>(requestUri, cancellationToken);
        return response?.Value ?? "";
    }
}

public record Response(string Value);
The ChatApiClient is registered in the Program.cs file.
builder.Services.AddHttpClient<ChatApiClient>(client =>
    {
        // This URL uses "https+http://" to indicate HTTPS is preferred over HTTP.
        // Learn more about service discovery scheme resolution at https://aka.ms/dotnet/sdschemes.
        client.BaseAddress = new("https+http://apiservice");
    });
and injected and used in the Chat.razor component
@page "/chat"
@attribute [StreamRendering(true)]
@attribute [OutputCache(Duration = 5)]

@inject ChatApiClient ChatApi

<PageTitle>Chat</PageTitle>

<h1>Chat</h1>

<p>This component demonstrates showing data loaded from a
backend API service talking to Ollama.</p>

@if (_response == null)
{
    <p><em>Loading...</em></p>
}
else
{
    <p>@_response</p>
}

@code {
    private string? _response;

    protected override async Task OnInitializedAsync()
    {
        var question = Uri.EscapeDataString("Hello, can you help me in C#?");
        _response = await ChatApi.ChatAsync(question);
    }
}
Running the .NET Aspire project
To run the .NET Aspire project, execute the following command in the terminal:
cd .\DeepSeekOllamaAspire.AppHost\
dotnet run
The .NET Aspire project will start, and you will see the Container “ollama” starting. The OllamaModelResource “chat” will download the DeepSeek-R1 model. When the Ollama server is ready, the ApiService will start, and the Web frontend will be available.
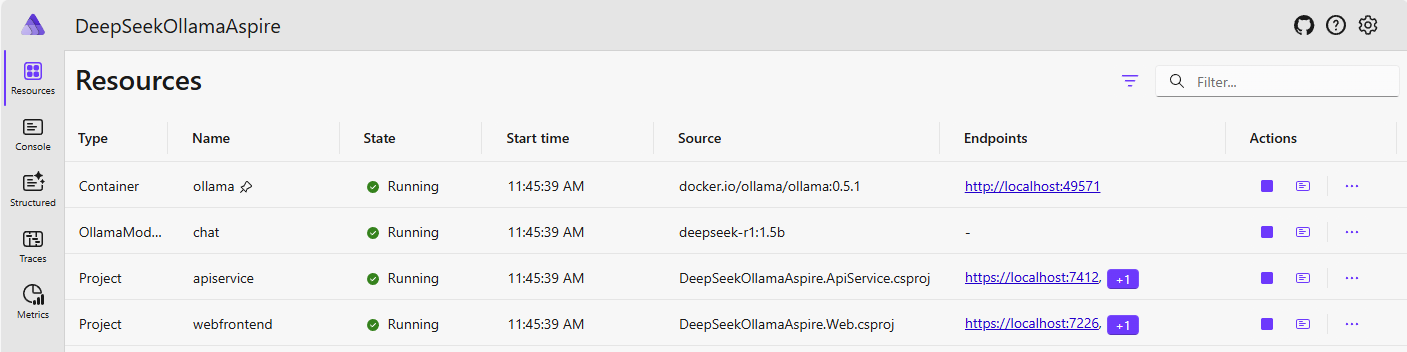
Click on the Project “webfrontend” link and then on the “Chat” link to see the answer generated by DeepSeek-R1.

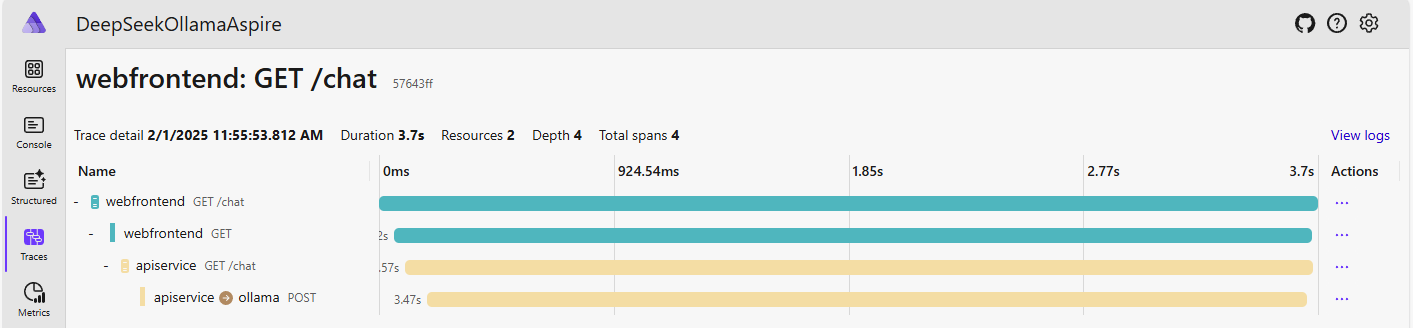
And with the power of .NET Aspire, you can observe the trace of the calls to the Ollama API.
Conclusion
By integrating DeepSeek-R1 with .NET Aspire and Ollama, developers can leverage a robust and efficient setup for managing and deploying language models. This solution provides an easy streamlined approach to running LLM or SLM on your local machine without the need for additional software installations.
References
- .NET Aspire Community Toolkit Ollama integration
- Ollama Docker image
- Ollama DeepSeek-R1 model
- Using Local AI models with .NET Aspire
Get the source code on GitHub laurentkempe/aiPlayground/DeepSeekOllamaAspire
