
Early in my journey in developing software, I used to start a project by setting first a way to build my software automatically each time I did a set of changes. Long, very long ago, I used scripts scheduled to run. When JetBrains shipped TeamCity I started to use it extensively for my projects, here is my first post about “Set Up a Build Computer using VisualSVN, Team City, MsTest, NUnit” from March 21, 2008, but used it since version 1.0. Later on, I also used Azure Pipelines to build Git Diff Margin and also GitHub Actions, for example, to build and deploy those pages.
History
I introduced TeamCity at Innoveo; all teams still use it today.
You can watch the video “How Innoveo Skye Business Canvas is built - CI From The Trenches #8” a conversation about how my team uses TeamCity to build the Innoveo Business Canvas. By the way, we are hiring; feel free to get in touch with me if you are interested!
We started using TeamCity UI with MSBuild as an ultra-fast getting started experience. We leveraged all runners integrated to run our whole build, from restoring nugets, compiling, running tests with code coverage, R# code inspections, NDepend analysis, packaging. It was serving us well. But we discovered that not versioning your build script with your code can be a real pain when you need to ship patches! That was a trigger for a change. We could have gone by versioning the TeamCity configuration into our code repository, so both would be aligned.
We had a look at lots of existing things on the .NET ecosystem like PSake, Fake. Till I found out Cake and presented to the team. We all liked that it was kind of C# as we are all C# developers. So, Cake helped us unify our different build processes in the “one” kind of C# project and we started to version with our app source code. Another improvement was that each developer could run our build on their machine! All of that keeping an easy integration in TeamCity. The project is open source and had (and still, I guess) a great responsive community.
We liked this new solution for quite some time then we had our build complexity start to grow. We didn’t keep it as clean as it could be, and even if it was C#, it was like C# but without all the developers tooling that you have as a C# developer. And it was starting to be painful to maintain with doing CTRL+F to find things.
So, some frustration started to appear. Honestly, a part of the problem was coming from us. On the other hand, another was really because of C# scripts, which is only like C#.
Why Nuke 💣 (FEB 2021)
I was following the Nuke project for some time. But, I never really invested the time to look deep enough to understand its full power. And oh boy, it is powerful! I had several discussions with its author Matthias Koch followed by a quick personal presentation. I decided it was time to invest some time to move to the next thing and nuke the past 😆
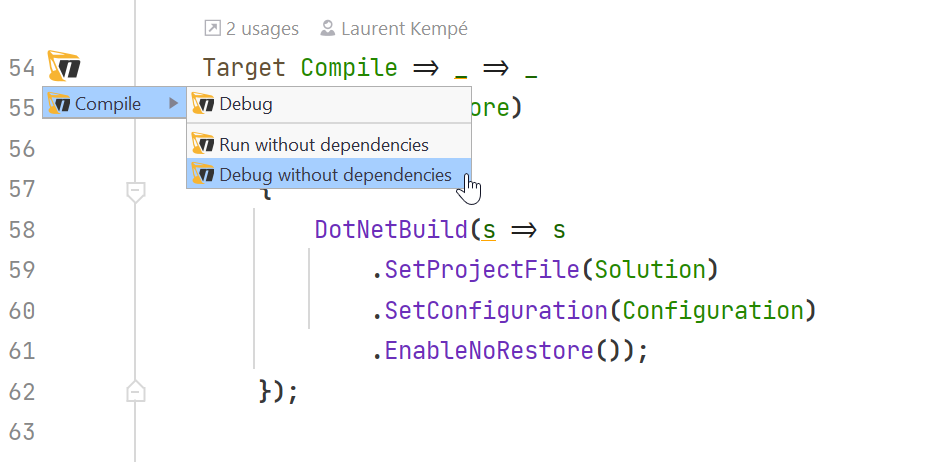
The first argument for me was; you develop your build pipelines in real C#! A killer feature for a C# developer, because it helps you to start very quickly with all the tools you know. On top of that, NUKE provides extensions for all major .NET IDE; Rider, Visual Studio, Visual Studio Code which let you run a target with its dependencies or without, start a debugging session directly from the target from the hit of a shortcut.
A developer experience, on another level 🏆! Again, it is real C# 😍, no more magic strings, no more CTRL+F 💝, all build pipelines in one .NET project 🥰 with code navigation, refactoring, debugging😻. Oh, and again all running with our already in place TeamCity, and everywhere you can run .NET.
You can generate CI Integration with partitioning. For example, you can run your tests on one agent in parallel to your static code analysis on another agent and shorten your overall build time. We have not gone that way for now, because of our build running in an acceptable average of 10 minutes. But, who would not like faster build time? Finally, it supports cloud build services GitHub Actions, Azure pipelines which we might consider in the future🔮.
Migration from Cake to NUKE
With all of those positive arguments, the decision to migrate was easy. I jumped on to migrate our Cake C# scripts to NUKE. As I wrote our Cake C# scripts were getting messy, nevertheless I decided to port with the current mess. More on that later.
It needed some new learnings but went straightforward without a big surprise. One thing that made it easy is that the high-level concepts of both tools are the same or very similar. The other is that even if Cake is C# scripts, you can easily copy this code and paste it into a NUKE project.
So, I had it running quite fast after starting the port, but with the mess. The next step was to refactor the whole. I wrote before it is a C# project. So I was in my comfort zone with all my refactoring tools in Rider. Again, this was super fast.
Something I liked was the easy CLI Tools interaction with Fluent API with almost all the tools we are using already integrated, except one NDepend.
I liked the easy CLI Tools interaction with Fluent API with almost all the tools we are using already integrated, except one NDepend. And that integration was also made simple. The only thing I had trouble with and needed some help with was that NDepend exited with an error code. We are breaking some NDepend rules. There is no way to change that. And NUKE then handled that as a build failure. Nothing wrong from the point of view of NDepend and NUKE. But, when you use tools like NDepend you cannot fix all the reported problems in one go. So, you often start by putting a rule that you at least don’t want to make worse. Over time, we extended NDepend with our own rules. Then also fixed some bundled broken rules. And we verify on each build that those issues do not reappear.
Getting started
Install NUKE extension for your IDE
Leverage the power of the NUKE IDE extensions to ease the creation, edition, debugging and execution of NUKE builds.
Install NUKE CLI .NET tool
NUKE CLI .NET tool will help you to create and execute NUKE builds, or even update to a new version of NUKE.
dotnet tool install Nuke.GlobalTool —global
Extend you shell with NUKE auto-completion
To simplify your life, you can extend your PowerShell, ZSH or BASH with auto-completion so that you don’t have to remember all nuke details and just tab!
Register-ArgumentCompleter -Native -CommandName nuke -ScriptBlock {
    param($commandName, $wordToComplete, $cursorPosition)
        nuke :complete "$wordToComplete" | ForEach-Object {
           [System.Management.Automation.CompletionResult]::new($_, $_, 'ParameterValue', $_)
        }
}
Create your first NUKE build project

From the project you want to build run
nuke :setup
Follow the easy steps and you are done with a basic C# build project!
Now, you can either run your build using NUKE dotnet tool
nuke [targets] [arguments]
or with the PowerShell script created
.\build.ps1 [targets] [arguments]
What code is generated?
NUKE build is implemented as a console application. I removed some minor parts to make it easier to understand.
class Build : NukeBuild
{
    public static int Main () => Execute<Build>(x => x.Compile);

    [Parameter("Configuration to build - Default is 'Debug' (local) or 'Release' (server)")]
    readonly Configuration Configuration
                = IsLocalBuild ? Configuration.Debug : Configuration.Release;

    [Solution] readonly Solution Solution;

    AbsolutePath SourceDirectory => RootDirectory / "src";
    AbsolutePath TestsDirectory => RootDirectory / "tests";
    AbsolutePath OutputDirectory => RootDirectory / "output";

    Target Clean => _ => _
        .Before(Restore)
        .Executes(() =>
        {
            SourceDirectory.GlobDirectories("**/bin", "**/obj").ForEach(DeleteDirectory);
            TestsDirectory.GlobDirectories("**/bin", "**/obj").ForEach(DeleteDirectory);
            EnsureCleanDirectory(OutputDirectory);
        });

    Target Restore => _ => _
        .Executes(() =>
        {
            DotNetRestore(s => s
                .SetProjectFile(Solution));
        });

    Target Compile => _ => _
        .DependsOn(Restore)
        .Executes(() =>
        {
            DotNetBuild(s => s
                .SetProjectFile(Solution)
                .SetConfiguration(Configuration)
                .EnableNoRestore());
        });

}
The entry point of the console application is Main and by default it calls Compile on line 3. With your preferred IDE you can use code navigation to get to the Compilecode. Compile is a Target and we can see that this is not a magic string which has been the case with other build tools 👍🏼.
A Configuration Parameter is defined which can be passed to our build to specify if it is a Debug or Release build.
A Solution is defined which is used later on the Compile Target. Through the usage of the C# attribute [Solution], the solution file will be found using either command-line arguments, environment variables, or finally _build\config\parameters.json file created when you generated the NUKE project.
{
  "$schema": "./build.schema.json",
  "Solution": "NukeBuildAutomation.sln"
}
Or it could be done like this
[Solution(".\\NukeBuildAutomation.sln")] readonly Solution Solution;Then some AbsolutePath are defined for SourceDirectory, TestsDirectory, OutputDirectoryshowing how easy it is to compose paths. Those are used in the Clean Target in which it is used to clean folder with a nice syntax SourceDirectory.GlobDirectories("**/bin", "**/obj").ForEach(DeleteDirectory).
Targets
NUKE uses similar dependency-based as other build automation solutions. The execution model is using Target which can relate one another and create a directed dependency graph.
In the generated code we can see that target Clean is told to run Before the Restore target. For the Compile target we can see that it DependsOn depends on the Restore target. You can read more about all the capabilities of NUKE in that matter in the NUKE documentation - Execution Dependencies.
A super nice feature is to be able to visualize our target relationships with a graph that NUKE generates for us, using the command
nuke —plan
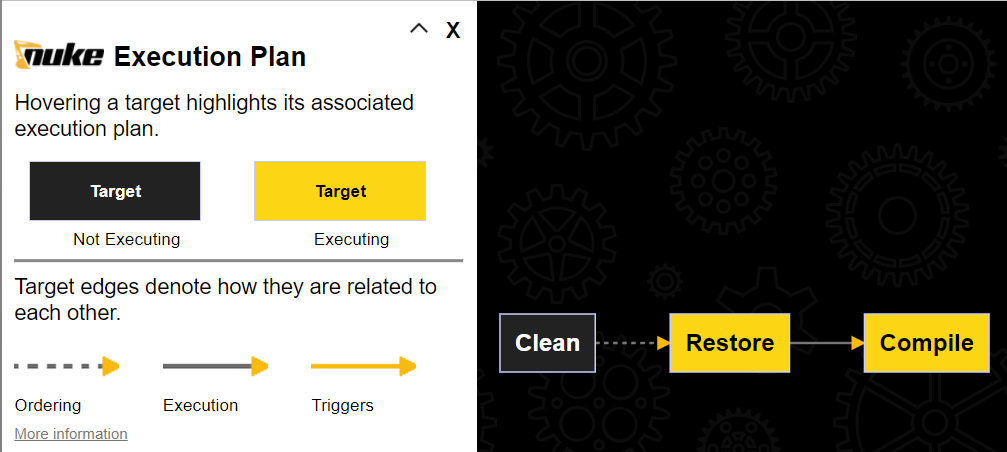
With such an execution plan defined by our targets, we can see that the Clean target is executed before the Restore target and the Compile target is executed after the Restore target. We also see that if the Clean target is not specified as a command line parameter it won’t be executed.
The .Before(Restore) on the clean Target means that even if you run your command like this
nuke Compile Clean
the Clean target will be executed before the Compile target.
Fluent API
The following code example shows NUKE fluent API which can be used with some pre-defined CLI tools. In that concrete case we are using JetBrains dotCover command line to run our tests with and generate code coverage report.
partial class Build
{
    const string TestResultsXmlSuffix = "_TestResults.xml";

    IEnumerable<string> TestAssemblies => GlobFiles(OutputDirectory, "*.Tests.*.dll");

    Target TestWithCoverage => _ => _
        .DependsOn(Compile)
        .Executes(() =>
        {
            DotCoverCover(GetDotCoverSettings, Environment.ProcessorCount);
        });

    IEnumerable<DotCoverCoverSettings> GetDotCoverSettings(DotCoverCoverSettings settings) =>
        TestAssemblies.Select(testAssembly => new DotCoverCoverSettings()
            .SetTargetExecutable(ToolPathResolver.GetPathExecutable("dotnet"))
            .SetTargetWorkingDirectory(OutputDirectory)
            .SetTargetArguments($"test --test-adapter-path:. {testAssembly}  --logger trx;LogFileName={testAssembly}{TestResultsXmlSuffix}")
            .SetFilters(
                "+:MyProject")
            .SetAttributeFilters(
                "System.Diagnostics.CodeAnalysis.ExcludeFromCodeCoverageAttribute",
                "System.CodeDom.Compiler.GeneratedCodeAttribute")
            .SetOutputFile(GetDotCoverOutputFile(testAssembly)));

    AbsolutePath GetDotCoverOutputFile(string testAssembly) => OutputDirectory / $"dotCover_{Path.GetFileName(testAssembly)}.dcvr";
}
Conclusion
There is much more to write about NUKE than just the basics. You can read more about it in the NUKE documentation. Nevertheless, I hope this blog post will help your to get started quickly. I heavily encourage you to invest the time to have a look to NUKE. It will for sure save you time when you want to automate your build pipelines in C# and have those run where ever .NET runs. For us, it was definitely a great decision to move to it and I would not look back. Now, I look forward to have some time to invest into its capabilities to partition our build and have it running in even less time. That would also be the reason to write another post on that particular capability 😉
Presentation
Press f key to see the presentation full screen, or navigate to it.
NUKE presentation video (French)
For French speaking people, join us for remote DevApps meetup each Wednesday late afternoon for a bit of fun. Here is the recording of the meetup about NUKE from 2.2.2022.
Code
You can find all the code used in this blog post and for the meetup on the following repository
