
Following my previous post on ASP.NET Core RC2, Docker and HipChat Connect add-on I wanted to learn the next step which is to deploy my Docker container on the Microsoft Azure Cloud!
Due to a known issue and to avoid to have issues with credentials you need to follow the instructions on the following page “Creating a Work or School identity in Azure Active Directory to use with Windows VMs”
KNOWN ISSUE: There is a known issue with Azure Active Directory causing stored credentials to expire within hours rather than 14 days when the user logs in with personal Microsoft Account (formerly Live ID) instead of an Active Directory account. Currently, there is no ETA for resolution, however in the meanwhile, you can create an AAD account and login with that as a workaround.
Now to get ready to deploy we need first the following:
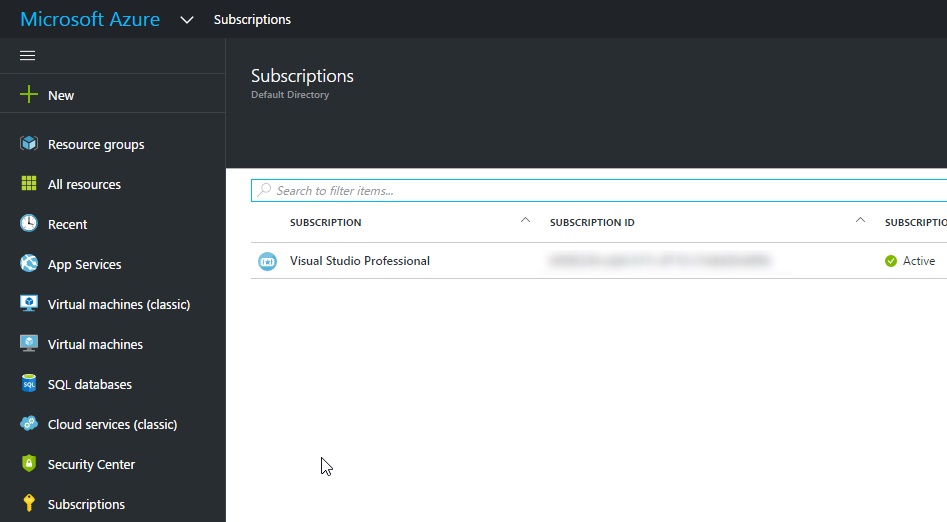
- Get an Azure account on Azure
- Get Azure subscription id from Subscriptions link
Then we need to create a machine on the Azure cloud which will host our Docker containers. For that we will use Docker Machine, you can read more about it on this web page “Use Docker Machine with the Azure driver”.
Using Docker for Windows, I execute the following docker-machine command to create the machine
C:\Users\Laurent
> docker-machine create --driver azure --azure-location westeurope --azure-subscription-id ADDYOURS hipchatconnect
Running pre-create checks...
(hipchatconnect) Completed machine pre-create checks.
Creating machine...
(hipchatconnect) Querying existing resource group. name="docker-machine"
(hipchatconnect) Resource group "docker-machine" already exists.
(hipchatconnect) Configuring availability set. name="docker-machine"
(hipchatconnect) Configuring network security group. name="hipchatconnect-firewall" location="westeurope"
(hipchatconnect) Querying if virtual network already exists. name="docker-machine-vnet" location="westeurope"
(hipchatconnect) Configuring subnet. name="docker-machine" vnet="docker-machine-vnet" cidr="192.168.0.0/16"
(hipchatconnect) Creating public IP address. name="hipchatconnect-ip" static=false
(hipchatconnect) Creating network interface. name="hipchatconnect-nic"
(hipchatconnect) Creating storage account. name="vhdsomfr2ogy52o" location="westeurope"
(hipchatconnect) Creating virtual machine. name="hipchatconnect" location="westeurope" size="Standard_A2" username="docker-user" osImage="canonical:UbuntuServer:15.10:latest"
Waiting for machine to be running, this may take a few minutes...
Detecting operating system of created instance...
Waiting for SSH to be available...
Detecting the provisioner...
Provisioning with ubuntu(systemd)...
Installing Docker...
Copying certs to the local machine directory...
Copying certs to the remote machine...
Setting Docker configuration on the remote daemon...
Checking connection to Docker...
Docker is up and running!
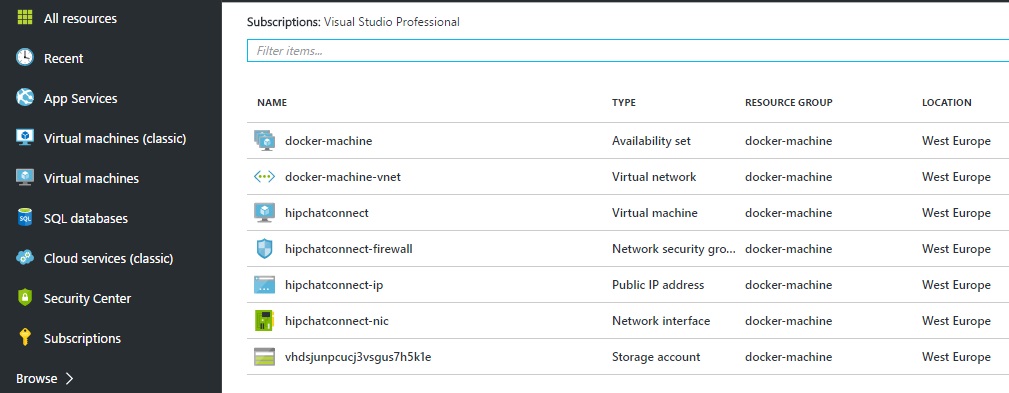
To see how to connect your Docker Client to the Docker Engine running on this virtual machine, run: C:\Program Files\Docker\Docker\Resources\bin\docker-machine.exe env hipchatconnectAfter a couple of minutes, we can check on the Azure cloud portal, All resources menu, that Azure created everything for us
Finally, we need to get the configuration to talk to that machine, and it’s Docker daemon
> docker-machine env hipchatconnect
$Env:DOCKER_TLS_VERIFY = "1"
$Env:DOCKER_HOST = "tcp://x.y.z.y:2376"
$Env:DOCKER_CERT_PATH = "C:\Users\Laurent\.docker\machine\machines\hipchatconnect"
$Env:DOCKER_MACHINE_NAME = "hipchatconnect"
# Run this command to configure your shell:
# & "C:\Program Files\Docker\Docker\Resources\bin\docker-machine.exe" env hipchatconnect | Invoke-Expression
Then execute the last line which will configure our local environment
& “C:\Program Files\Docker\Docker\Resources\bin\docker-machine.exe” env hipchatconnect | Invoke-Expression
Now each docker commands will be executed by the machine hosted on Azure cloud. Easy and awesome!
Next step is to have a Docker container to deploy! We will use the container from my previous post “ASP.NET Core RC2, Docker and HipChat Connect add-on”.
First, we need to build an image using the following command
> docker build -t hipchatconnect .
Sending build context to Docker daemon 1.441 MB
Step 1 : FROM microsoft/dotnet
latest: Pulling from microsoft/dotnet
8b87079b7a06: Pull complete
a3ed95caeb02: Pull complete
1bb8eaf3d643: Pull complete
3e04171ce2e5: Pull complete
bd09d56bccd6: Pull complete
5d7408f25e6a: Pull complete
Digest: sha256:5ffec15e54ce30c40dc40d81222d87495b675d81d68c68eda09558d62ac211aa
Status: Downloaded newer image for microsoft/dotnet:latest
---> ceef90b6765e
Step 2 : ENV ASPNETCORE_URLS "http://*:5000"
---> Running in fd2186f53b53
---> e97d74f73f17
Removing intermediate container fd2186f53b53
Step 3 : ENV ASPNETCORE_ENVIRONMENT "Development"
---> Running in 5e768a476c06
---> cfcafa6ec0b4
Removing intermediate container 5e768a476c06
Step 4 : COPY . /app
---> c306c31742cc
Removing intermediate container 1bdb65029a8a
Step 5 : WORKDIR /app
---> Running in a41ce7e35415
---> d074cc6cb3fb
Removing intermediate container a41ce7e35415
Step 6 : RUN dotnet restore
---> Running in e93f545f01f1
log : Restoring packages for /app/project.json...
info : GET https://www.myget.org/F/aspnetrc2/api/v3/flatcontainer/microsoft.netcore.app/index.json
info : GET https://api.nuget.org/v3-flatcontainer/microsoft.netcore.app/index.json
info : GET https://api.nuget.org/v3-flatcontainer/microsoft.aspnetcore.mvc/index.json
...
NuGet Config files used:
/app/nuget.config
/root/.nuget/NuGet/NuGet.Config
Feeds used:
https://www.myget.org/F/aspnetrc2/api/v3/index.json
https://api.nuget.org/v3/index.json
Installed:
206 package(s) to /app/project.json
---> e3a436d91604
Removing intermediate container e93f545f01f1
Step 7 : EXPOSE 5000
---> Running in d7cee657215f
---> 9ee89d4fb68d
Removing intermediate container d7cee657215f
Step 8 : ENTRYPOINT dotnet run
---> Running in 333a6914a1d8
---> b1685a1c81f8
Removing intermediate container 333a6914a1d8
Successfully built b1685a1c81f8
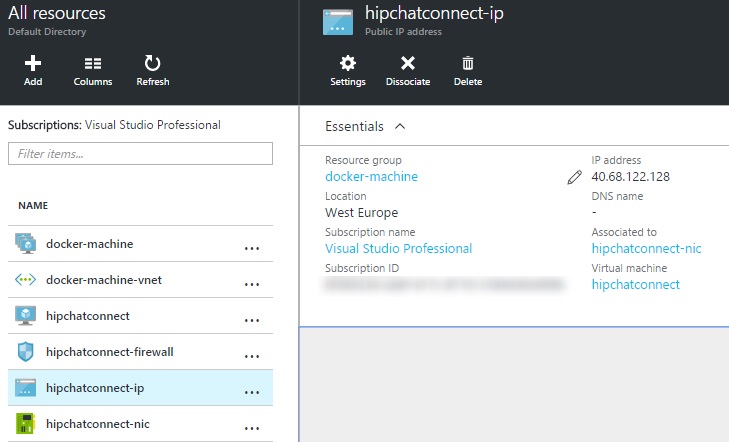
SECURITY WARNING: You are building a Docker image from Windows against a non-Windows Docker host. All files and directories added to build context will have '-rwxr-xr-x' permissions. It is recommended to double check and reset permissions for sensitive files and directories.Then we need to get the public IP of our machine on the Azure portal
We can run the container on Azure cloud with
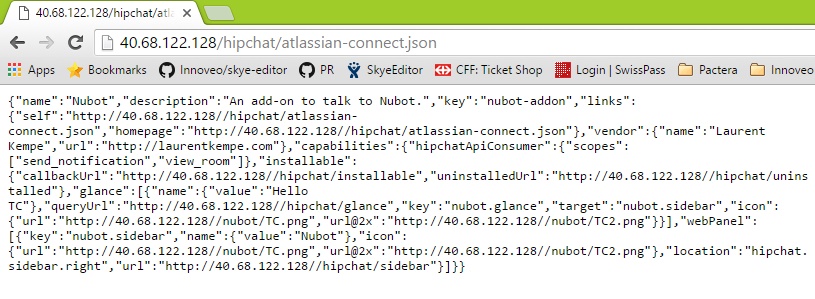
docker run -d -p 80:5000 -e NGROK_URL=‘http://40.68.122.128’ hipchatconnect
To be able to connect to our connector on the HTTP port 80, we will need to configure the firewall

and finally, connect to it!
What a great experience to be able to create a machine in the Azure Cloud from the command line and deploy our software so quickly!
Now that it works we will need to tackle the next issue, which is to expose the container through https because HipChat Connect needs it so that the add-on can be installed in HipChat. But that’s for another post.