Build ClickOnce deployment packages using MSBuild and Team City
The other day I was requested to automate our build process to issue different ClickOnce setup for the same application. The main difference was some configuration files pointing to different back end web services.
To start I had to create new build configurations on Team City which used the following settings for the Build Runner:
- Targets: Rebuild Publish
- Configuration:** One per build configurations; e.g **DeployClickOnce, integrationDeployClickOnce
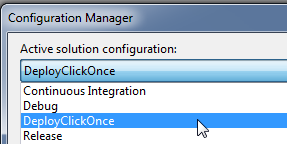
Then in my Visual Studio 2008 solution I created several Solution configuration reflecting the different configurations that I needed during my deployment, e.g. DeployClickOnce
Then using the project properties from the solution explorer in Visual Studio I had to set all Publish options I was interested in; Publish Location, Installation Folder Url, Install Mode and Settings, Prerequisites…
[![4048988539_2a9f77285f_o[1] 4048988539_2a9f77285f_o[1]](http://weblogs.asp.net/blogs/lkempe/4048988539_2a9f77285f_o1_thumb_614C5E8A.png) ](http://weblogs.asp.net/blogs/lkempe/4048988539_2a9f77285f_o1_1B4BC744.png)
](http://weblogs.asp.net/blogs/lkempe/4048988539_2a9f77285f_o1_1B4BC744.png)
The issue now is that the Publish Version automatically increment the revision with each publish. But this doesn’t work with our continuous integration server Team City as it would need to checkin the modified file back to subversion. SO a different approach was needed.
The solution I used is to use the Build Number offered by Team City, so I had to modify the MSBuild script to use the the BUILD_NUMBER. To do that, right click in the Solution Explorer on our project and select Edit Project File:
[![4049748852_2ea06972ca_o[1] 4049748852_2ea06972ca_o[1]](http://weblogs.asp.net/blogs/lkempe/4049748852_2ea06972ca_o1_thumb_238F5101.png) ](http://weblogs.asp.net/blogs/lkempe/4049748852_2ea06972ca_o1_650A035A.png)
](http://weblogs.asp.net/blogs/lkempe/4049748852_2ea06972ca_o1_650A035A.png)
Then you will face the your MSBuild script, and you will have to search for the configuration that we defined some steps before:
- <PropertyGroup Condition=“ ‘$(Configuration)|$(Platform)’ == ‘DeployClickOnce|AnyCPU’ “>
Then before the end of the closing PropertyGroupd tag add the following lines:
- <ApplicationRevision>$(BUILD_NUMBER)</ApplicationRevision>
- <InstallUrl>http://myserver.com/</InstallUrl>
- </PropertyGroup>
**ApplicationRevision **will overwrite the Application revision using the BUILD_NUMBER defined by Team City.
**InstallUrl **is another configuration that we want to override because we want to create multiple ClickOnce setup installed from different urls. So for DeployClickOnce you will have an InstallURL and for integrationDeployClickOnce you will have another one.
Now we are ready for the final step in which we want to exchange some configuration files related to the different ClickOnce builds and Publish the output to an IIS server so that our testers can access the different ClickOnce package for the different stages.
ClickOnce secure the different files that are created with checksums so that they cannot be mitigated during the installment transfer. So the only option we have to be able to exchange our configuration files is before compilation. So we had a Target to our MSBuild script:
- <Target Name=“BeforeCompile“>
- <CallTarget Targets=“ExchangeDefaultSettings“ ContinueOnError=“false“ />
- <CallTarget Targets=“ExchangeAppConfig“ ContinueOnError=“false“ />
- </Target>
The BeforeCompile target will be called before each build and will exchange our App.config and another settings file containing stage dependant configuration.
Here is the simple target which exchanges the App.config stored in a configs folder:
- <Target Name=“ExchangeAppConfig“>
- <Message Text=“####### CONFIG Exchange $(Configuration)|$(Platform) ———#“ />
- <Copy Condition=“ ‘$(Configuration)’ == ‘DeployClickOnce’ “
- SourceFiles=“$(SolutionFolder)\Sources\Application\configs\localhost.App.config“
- DestinationFiles=“$(SolutionFolder)\Sources\Application\App.config“
- ContinueOnError=“false“ />
- <Copy Condition=“ ‘$(Configuration)’ == ‘integrationDeployClickOnce’ “
- SourceFiles=“$(SolutionFolder)\Sources\Application\configs\integration.App.config“
- DestinationFiles=“$(SolutionFolder)\Sources\Application\App.config“
- ContinueOnError=“false“ />
- </Target>
The ExchangeDefaultSettings Target works the same.
So before any compilation of our solution using the DeployClickOnce, integrationDeployClickOnce solution configuration the App.config and the default settings file are exchanged. So after the compilation they will be correct according to the stage that we target.
The final step is to Publish the ClickOnce package created to the IIS server. As we defined the Targets: Rebuild Publish, there will be a Rebuild and then a Publish phase in our build script. So now we have to take care of the Publish target.
So we add a Target Publish as here:
- <Target Name=“Publish“>
- <CallTarget Condition=“ ‘$(Configuration)’ == ‘DeployClickOnce’ “
- Targets=“DeployClickOnce“
- ContinueOnError=“false“ />
- <CallTarget Condition=“ ‘$(Configuration)’ == ‘integrationDeployClickOnce’ “
- Targets=“DeployClickOnce“
- ContinueOnError=“false“ />
- </Target>
Which just call a Target DeployClickOnce for the configuration we are interested in: DeployClickOnce and integrationDeployClickOnce.
The DeployClickOnce Target is responsible to xcopy the packages created by the Publish Target to the different IIS path used to host our ClickOnce deployment setup:
- <Target Name=“DeployClickOnce“>
- <Message Text=“####### Deploy ClickOnce $(Configuration)|$(Platform) ———#“ />
- <Exec Command=“xcopy /E /Y $(ClickOnceSrc)*.* $(ClickOnceDestination)“ />
- </Target>
This is achieved by using two variables ClickOnceSrc and ClickOnceDestination which are also defined per solution configuration like the ApplicationUrl and InstallUrl. The destination is a folder on a IIS server which already has a manually customized Publish.htm file.
- <PropertyGroup Condition=“ ‘$(Configuration)|$(Platform)’ == ‘DeployClickOnce|AnyCPU’ “>
- <ClickOnceSrc>$(TestsFolder)\Output$(OutputPath)app.publish</ClickOnceSrc>
- <ClickOnceDestination>E:\Inetpub\Application</ClickOnceDestination>
And
- <PropertyGroup Condition=“ ‘$(Configuration)|$(Platform)’ == ‘integrationDeployClickOnce|AnyCPU’ “>
- <ClickOnceSrc>$(TestsFolder)\Output$(OutputPath)app.publish</ClickOnceSrc>
- <ClickOnceDestination>E:\Inetpub\Application\integration</ClickOnceDestination>
Now you have two build configurations which output two valid ClickOnce setup packages using different stage dependant configurations that your tester can install directly from your ClickOnce web site. And if you have configured the automatic update of the application through the ClickOnce Application Updates then the applciation will be updated automatically when a tester start you application.
Enjoy!


